Monday, June 30, 2008

A quick Thai soup


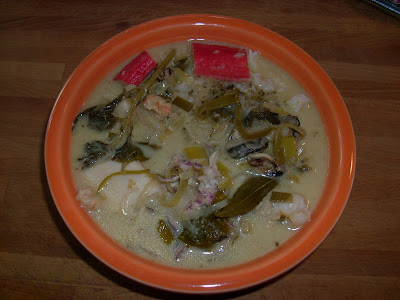
Now that you all have put in a hard one hour of work making a home made green curry paste, I can show you when it really pays off. I love to make a quick soup for lunch and you can't get much easier than this. I picked up some candy onions and leeks from my market, chopped them and sauteed them with a couple of tablespoons of the curry paste. Then I added:

2 cups of stock or water (I used chicken stock)
1 can of coconut milk
The protein of your choice (I used a 1 lb. bag of mixed seafood which included squid, octopus, clams, mussels, surimi and who knows what else) but chicken works great
1 tbsp. of fish sauce
Juice of 1 lime
A small chunk of jaggary (palm sugar) or brown sugar

That is all you need but because I still had some of the ingredients from the curry so I thought that I would add them.

Lime leaves
A slice of galangal
Thai basil
Cilantro
Curry leaves (just because I had some)

Simmer all of the ingredients together for a few minutes and add the protein at the end, just long enough to cook it through. This should only take you 10 or 15 minutes to prepare. Serve it over rice or rice noodles, or any other noodles for that matter.


There you go, quick easy and delicious.

(P.S. After I posted that putrid picture of the pasta with pesto, I thought I owed you a couple of decent ones of this soup. I'll have to pay more attention to the tips I get from Jerry mann.)

Friday, June 27, 2008

A mountain of fresh basil


Summer is here and I finally get to enjoy one of my favorite herbs in abundance. To me, basil tastes like summer and I love to eat it a hundred different ways. From a last minute addition to a fresh tomato sauce, to using it as a salad green, to grabbing a leaf out of the garden, wrapping it around a cherry tomato and popping it in your mouth, basil is good anytime. Like most people, the first thing I think of when I have a pile of it is basil pesto. Pesto is, of course, great over pasta as a quick summer meal but when I do this I like to deconstruct the pesto. I simply pound the basil in a mortar with salt (you could do this in a food processor but I like a more rustic texture and the mortar is easier to wash) and then add olive oil and maybe a liile lemon juice. The toasted pine nuts, garlic and cheese will be added to the pasta separately.


I do this for two reasons. First, I like the separation of flavors and textures you get, and second, I like to freeze some extra for when I need a bit of summer in the colder months. I don't like the idea of freezing garlic or cheese, the garlic seems to get bitter and the texture of the cheese changes. It's only a little bit of work to turn this frozen mixture into a fresher tasting pesto by adding the other ingredients when you plan to use it.

All you need to do is toss your cooked pasta with the basil mixture, add some finely minced garlic, toasted pine nuts and some good italian cheese shaved with a vegetable peeler (in this case Parmigiano Reggiano and Locatelli Romano). Quick, simple and delicious.


Pesto is named for the mortar and pestle used to make it. Remember that next time your eyeing your food processor

Thursday, June 26, 2008

German hefeweizen

I've brewed a lot of beer and by 'a lot' I mean enough to have broken the '200 gallons per household per year' law 5 years in a row. It might come as some surprise that after over 1600 gallons brewed I never brewed a German "hefe". After my friend Jerry made a trip to Germany last year, we have been working brewing some German styles. This is not a hard beer to brew. You only need two grains for your mash, a good German 2-row Pilsner malt and some malted wheat. American versions often go heavier on the Pilz malt but in Germany it's all about the wheat. The first batch we brewed we chose to go 50/50 on the grains and for the second batch we used 70% wheat. Hopping is light, between 3 and 3.5 AAUs per 5 gallons with no finishing hops.

I'm not going to describe the whole brewing process. There are many books and web pages that can do a better job than I at teaching you how to brew. Go to beertown.org to find a homebrewing club near you. If you like beer you should definitely learn how to brew.

For 5 gallons:
5 lbs. Durst pilsner malt
5 lbs. Rahr red wheat malt

Mash in at 50 degrees Celsius with 2 1/2 gallons water for 30 min.
Raise mash to 65 degrees with 1 1/4 gallons of boiling water for 60 min.

Sparge to collect 6 gallons

Boil for 90 minutes adding:
3.3 AAUs (one ounce) Hersbrucker pellet hops for 75 min.
Enough water to leave 5.5 gallons after boil.


Cool and rack off of sediment to your sanitized fermenter.

Pitch with a good German hefewiezen yeast and oxygenate well.

If your yeast culture is strong you should see activity in less than 12 hours. If your yeast is really strong this will happen.


This beer was done fermenting in about six days. We racked half of it to a keg after 8 days and the other half was racked to a secondary fermenter for 4 days of cold conditioning before bottling it. (We brewed 10 gallons). What a perfect summer beer and the clove and banana notes from the 'hefe' yeast (redundant, I know) go great with the fun stuff I'm making with my recent batch of curry paste.


It's not really your beer if you didn't brew it yourself.

Tuesday, June 24, 2008

Curry paste

Here is one of those things that even the most adventurous cooks rarely do from scratch. This is a shame. I doubt the home cooks on the other side of the planet fret over the details of these creations and you shouldn't either. Like curry powders and mole', the list of ingredients and the descriptions of the processes used to make them often make the recipes in books sound daunting. Read these recipes but ignore them. The only hard part for many should be sourcing the right ingredients.


The crucial ingredients (in my opinion): Galangal, lemon grass and lime leaves

Living in Cleveland, we are fortunate to have many stores selling obscure ingredients from around the world but last week was the first time that I ever found fresh galangal root here. My first curry pastes were successfully made with frozen galangal, frozen lime leaves and frozen lemon grass. Now I can finally make one with all of the appropriate fresh ingredients. The trick to deciding how to mix these or any ingredients in the right proportions is simply tasting them. I often tell my customers that while something may not necessarily have a pleasant flavor on its own, the only way to get an a good idea of how much to use is to taste it. My first bite of fresh galangal was memorable to say the least. It is the only ingredient that absolutely shouldn't be left out. After that you can use whatever you like and can find. Besides my big three I used Thai basil, cilantro (often the roots and stems are used so don't throw them away), lime (juice and zest), garlic, ginger, shallots, green chiles (they are a staple of green curry pastes these days but if you don't like it hot, remember that they were making these mixtures long before chiles were ever introduced to that part of the world), turmeric root (not traditional but I had it so why not), and the dry spices, coriander, cumin and white peppercorns, all toasted and ground. The last ingredient that is in most recipes is shrimp paste. You can find it in any Asian store. It is funky and potent but it adds the umami to bring the whole thing together.


You could use a food processor or a blender but both would require the addition of liquid and it's better to keep it on the dry side. They also chop more the smash so I don't believe that you get the same extraction of flavor. Nothing is like the good old mortar and pestle. A little salt will help break everything down. Add your ingredients and beat the shit out of them.


The best way to taste your creation is a simple rice dish. Just heat a little oil, fry some of the paste and add some cooked rice with a little liquid and mix. If there is anything wrong (there wont be) you can easily taste it this way and make adjustments if necessary


It will take about an hour of your time and about $5.00 worth of ingredients. It freezes well so you will use it for several meals. And it's fun. Don't let peoples overly anal descriptions of these kinds of recipes deter you. They are actually pretty hard to fuck up. Enjoy.

Monday, June 23, 2008

My favorite sweet potato

(Caution: Requires sense of humor)


I didn't plan on buying a sweet potato when I left for the market last December but out of the corner of my eye, there she was. I can't explain the attraction. I can only say that, for the last six months, my friends and family have enjoyed her presence at my house nearly as much as I have.

Alas, when I checked on her this morning, I noticed that she wasn't quite herself. She is beginning to wrinkle and sprout.


Do I continue to care for her until all quality of life is gone or do I bury her in the back yard and hope for another, as unique and desirable as her mom? What should I do? I don't know.

Monday, June 16, 2008

Fresh herbs and skirt steak

One of my favorite steaks (o.k, maybe my favorite) is the humble and misunderstood skirt steak. In many meat books, it is referred to as a braising cut. While this may be true, it is also great cooked quickly to medium-rare. While many beef cuts, including the skirt, are great on the grill, it's the skirts ability to be cooked to perfection in a pan on the stove in minutes that makes me love it. While it is usually advisable to cook steak (and most meats) from room temperature, I make an exception for this cut. It is so thin that it can be hard to get a great sear before over-cooking the inside so I always cook it right out of the fridge. Anything past medium rare is overcooked for any steak. This is not an opinion, it is fact.

One of the less appreciated techniques for infusing fresh herbs into meat is my favorite. Simply sear the meat by placing it directly on top of the herbs (in this case rosemary) in a screaming hot skillet. The herbs will often nearly burn but the flavor will completely permeate the meat.

I took a skirt steak from the fridge and seasoned it with a little salt and equal quantities of fresh ground, course black pepper and red pepper flakes (not crushed red pepper). Heat a skillet until it is smoking, add a small amount of fat, set your herbs of choice in the pan and the steak goes on top. One of the problems people seem to have when cooking steak in a pan is that pockets of steam get trapped underneath and compromise the crust by creating those un-crispy gray spots. Contact with the pan is crucial. To accomplish this I like to use a weight. A smaller cast iron skillet or a brick wrapped in foil will make a perfect weight.


It only takes a couple of minutes on the each side to get a crispy crust and leave the inside rare to medium-rare.


All you need is a splash of your favorite beer, wine, stock, vinegar or other liquid (in this case Marsala) in the hot pan to make a quick pan sauce and a side of fresh, local steamed asparagus drizzled with olive oil and a sprinkle of any great topping salt and you've got a perfect meal.

Go to your local butcher today and save the skirts from the meat grinder.

Friday, June 13, 2008

Brisket with strawberry/guajillo bbq sauce

Strawberries are in season! While I enjoy them just as they are and in desserts, I see no reason that they should be excluded from the main course or the joy of summer barbeque. Yesterday, when the bacon was done and the mash was resting, I headed to my local butcher shop and picked up a five pound beef brisket. The first thing I did was to give it a dry rub with salt, brown sugar, guajillo chile powder, paprika, garlic powder, dry mustard, savory and probably a few more things I forgot (I love doing improvised dry rubs). I then smoked the brisket, using hickory, the same way I did the bacon.


While it was smoking I worked on my first strawberry-based barbeque sauce:

1 quart fresh, local strawberries
1/2 cup guajillo chile powder
1/4 cup dark brown sugar
2 tbsp. blackstrap molasses
1/4 cup red wine vinegar
2 tbsp. granulated garlic
1 tsp dry mustard
Salt and fresh ground black pepper

I threw all of this in my Vita-Mix and made a smooth puree.

After a few hour of smoking I placed the brisket in a foil pan with about a cup or two of the sauce and covered tightly with foil.


I let it cook gently over the waning fire for about an hour. It was good right off of the grill but once it was chilled over night, sliced thinly and served with some of the reserved sauce it was spectacular. The strawberry flavor was distinct but not at all out of place. Strawberries aren't just for dessert anymore.


If you would like to enter you strawberry recipe in the strawberry moon contest click here.

Bacon

As I mentioned in my previous post, I've been making bacon from scratch. If you haven't tried doing this at home yet, I highly recommend it. It is incredibly easy and takes very little time. The bacon I was smoking when I cooked the calamari was the most basic, just a standard cure of salt (50%), dextrose (40%), and pink curing salt (10%). All you do is rub the pork belly with a generous amount of the cure, put it in a zip bag and refrigerate for a week.


The part most people would consider a "deal-breaker" is the smoking. If smoking is not an option, roast it in a 200 degree oven. You could always add some smoke to your cure if your oven roasting but un-smoked bacon will still be good. The smoking can be done on any backyard grill. All you need is some tasty smoking wood, an old cast iron pan and, of course, charcoal. Build a small fire, push the coals to the side, place the pan full of wood chips directly on the fire and put the rinsed bacon as far from the fire as possible. Cover the grill and, as slowly as possible, smoke the bacon only opening the grill to add charcoal or wood. Your goal is an internal temp. of 150 degrees.


Yesterday, while making ten gallons of German hefeweizen with my friend " Jerry Mann, photographer", I smoked my next two bacon experiments. I split the pork belly and rubbed in the cure. To one half, I added a pastrami-esque spice rub of fresh cracked black pepper, cracked coriander, garlic, onion, chili flakes and probably some other random spices. To the other half, I added a 1/4 cup of fresh Ohio maple syrup to satisfy the wife's preference for a sweeter bacon. This time I smoked it with some cherry twigs instead of the hickory that I used the first time.


The results are awesome. It ends up being less expensive than store-bought and the bonus I didn't expect, it doesn't shrink when you cook it as much as the stuff from the store. I'm guessing that most bacon is brine-cured so you're buying a lot of moisture that you end up cooking out, which, I assume, is why you end up with those pathetic little pieces.

I would suggest getting "Charcuterie" by Michael Ruhlman if your interested in making all kinds of smoked and dry-cured meats.

Thursday, June 5, 2008

Curried and smoked calamari w/ chili-lime pickle mayo

I almost never cook the same thing the same way twice. While I learned early on that it's important to take good notes when brewing, I never got into the habit of doing the same when I cook. Almost all of my most successful meals are lost to history. This is at least one of my motives for starting this blog.

A couple of weeks ago, I was smoking my first homemade bacon and trying to decide how to cook the squid I had defrosted for lunch. At a loss for an interesting idea, I decided to try smoking it. I took some curry powder and Murray River salt and lightly seasoned the cross-hatched pieces of calamari I bought at Trader Joes. I placed them in a saute pan and set the pan over the hickory smoke next to the bacon on the grill. They cooked slowly for about 15 minutes until the smallest pieces just started to get tough. The result was fantastic! The smoke was subtle, clean and unobtrusive. The texture was tender with just a little bite. I've always followed the "under two minutes or over two hours" rule to cooking squid so I truly expected this to fail.


It went well with this mayonnaise I made a couple of days earlier.

Using standard mayo making procedure, combine:

1/2 cup olive oil
1/2 cup canola oil
1 egg yolk
Juice of 1 lime
1 piece of lime pickle, minced (Asian store)
1 heaping Tbsp chili pickle (Asian store)
and salt to taste


I love when something that I think will flop works so well.