Wednesday, March 25, 2009

Homemade goatmilk ricotta


The first time I made ricotta was about a year and a half ago. I began buying goat cheese from Lake Erie Creamery and asked about getting some whey to make ricotta. I was told that it can't be made from an acid precipitated whey because there are no solids left after the process of making chevre. Even though everything I read said the same thing, I decided to try anyhow. After heating four gallons of the whey I did get about a pound of very tangy cheese. While it was certainly not real ricotta it was usable and I made a zucchini casserole that took into account it's tart, lactic quality. Why mention this? Well, if you have access to whey from an acid precipitated goat cheese, don't write off the possibility of making a ricotta-type cheese from it. If you're clever, you will be able to come up with a recipe that will benefit from a tangy soft cheese.

Since then, Lake Erie Creamery have begun making several other cheeses including a French feta and the award-winning Blomma. I requested whey from a rennet-precipitated cheese and received nine gallons from a Caerphilly they are currently working on.

I did a search on making homemade ricotta and the first problem that I had with the results was that the over-whelming majority begin with or include milk. This ignores the spirit behind ricotta which is to take advantage of a by-product, whey. So for starters, no milk. The second variable was whether or not it would require the addition of an acid to increase yield or coagulate at all. After all, ricotta is supposed to be an heat AND acid precipitated cheese. I thought it would be smart to split the whey and try it both ways.

The first batch was the simple version. All We did was heat 4 1/2 gallons of the whey to 200 degrees and large chunks of curd began to form immediately. We scooped the clumps into a strainer lined with cheesecloth and then gently spooned the rest of the liquid through. After a half hour or 45 min. we had a pound and a half of delicious cheese. Definitely easy enough to make homemade ricotta on a regular basis.


The second batch would have an acid added. There were several quantities and types of acid suggested including one that suggested as much as 1/4 cup for two gallons of whey. That sounded like an awful lot of acid so I decided on a modest two tablespoons of lemon juice expecting that if the flavor came through (which it did), it would be more pleasant than vinegar. We heated the 4 1/2 gallons of whey to 200 degrees and added the lemon juice. We saw nothing. None of the big clumps that so easily formed without the acid. I even called Mariann at the creamery to make sure the whey in each bucket was exactly the same. She confirmed that it was. Since there was some very fine particles in the pot we decided to strain it anyhow. The fine particles nearly completely clogged the cheesecloth but it continued draining very slowly. After several hours (during which we reheated the spent whey from batch one and added 1/4 cup of vinegar to see if we could squeeze any more curd from it. Nope.), we finally got the last of the liquid in the strainer but it would take all night until it drained to approximately the same moisture level as the first batch.


The results were surprising. Two distinctly different cheeses. The first one had a texture similar to standard supermarket stuff but with a far superior flavor along with just a hint of "goatiness". The second batch, much to our surprise, did have a slightly better yield, about 1 5/8 lb and an amazing soft, fine cream cheese like texture with a hint of lemon. Both were awesome in their own way.

Batch one became part of a cannelloni dish. I seasoned the cheese modestly with salt, white pepper, a dash of nutmeg and a little mixed Italian seasoning. I rolled the mixture in some squares of fresh pasta that I made and fit them into a baking dish. I topped them with a simple sun-dried tomato sauce I made by sauteing in olive oil, garlic, onion and minced sun-dried tomatoes (or more correctly "oven-dried tomatoes" that I dried last fall and packed with olive oil in mason jars) and adding some heavy cream. The wife and I must have sound ridiculous as we moaned our way through this meal. It was awesome.


Batch two was seasoned with some sugar, vanilla and a tiny pinch of salt and rolled into some homemade crepes and topped with some black raspberry jam that we heated until it melted into a sauce. These we ate for breakfast and, needless to say, they were great.


As good as batch two was, it was no fun to strain. I will do it again, primarily to see if I get similar results with a different batch of whey (the real variable) but I can't see doing it regularly unless I come up with a more efficient straining process. On the other hand, batch one was so good and so easy that I expect this to be how I get all of the ricotta I use in the future. It was a simple and low impact process. It took maybe an hour and a half and and half of that was spent bringing it up to temp. The half hour or 45 min. strain and drain was well worth the pound and a half of excellent (and free) cheese. If you have access to whey I highly recommend that you intercept some before it all goes to feed these hogs.

Wednesday, March 4, 2009

Some beer recipes


I recently threw my semi-annual beer bash and since I've found it hard to post about my beer and brewing I thought this was the right time to talk a little about it. I had six beers on tap and I cooked up a menu that included each of them in a recipe, something I hadn't done before. Unfortunately, I didn't take the time to shoot many photos but here are some details:

On tap no.1 I had a Belgian wit, not just any wit but without a doubt the best one I ever brewed. My opinion of this beer was backed up by the fact that it was the first keg emptied at the party. This is the first time a wit has beaten out both my pale ale and my IPA for this distinction. Here's the recipe.

Mash: 1.5 gal. per pound at 65 degrees centigrade for 90 min.
5 1/4 lb. Durst Pilz malt (Yes, it's German but I couldn't get the Dingemans pilz I prefer)
5 1/4 lb. raw red winter wheat (I'm a big believer in using the traditional raw wheat in these beers)
1 ml. lactic acid
Sparge: 4.5 gal w/ 1 ml lactic acid at 100 degrees centigrade for 90 min. (Yes, I sparge hot but as long as the grain bed doesn't increase above 75˚ you will be ok)
Boil: 75 min.
1 ml. Hopshot 60 min. (Hopshot is a hop extract I've been experimenting with, 1 ml= about 10 IBU's or substitute 3.5 or so AAU's of your favorite noble hops)
.75 oz. whole coriander seed (steeped for 45 min. after boil)
.5 oz. bitter orange peel (steeped for 45 min. after boil)
Pitch: White Labs 400 Belgian Wit yeast tube and aerate or oxygenate well.

O.G. 13 F.G. 3.2 A.B.V 5.3%

With this beer I made unconventional Belgian carbonade. Traditionally, cabonades are a beef and onion stew made with an Oud bruin (old brown), A slightly sour/malty Belgian beer. I used this wit and echoed the flavors by adding some ground coriander and giving it it's sweet and sour notes with cider vinegar and an orange/apricot fruit spread added at the end.


On tap no.2 I had a Belgian tripel brewed with 1 1/2 lbs. of local honey. These can be dangerous beers to put out at a party because they are both potent and deceptively easy drinking. As a warning to the uninitiated I named this one "Tripel Fukt" complete with a blue silicone phallus as a tap handle.

Mash: 1.25 gal. per pound at 68˚ centigrade for 90 min.
11.5 lbs. Durst pilz malt
.5 lb. Breiss dextrine malt
1 ml. lactic acid (the lactic acid in both of these recipes adds just enough acidity to help avoid having them end up "floppy" of cloying because they are not very bitter beers)
Sparge: 6.25 gal. at 100˚ for 90 min. (long sparges will give you better yields)
Boil: 90 min.
7 AAU's whole Sterling hops 30 min.
1 1/2 lbs. honey added at the end of the boil
Pitch: White Labs 500 Trappist ale yeast (This is a strong yeast but you should make a starter. I used the slurry from a Dubbel I had previously brewed) Oxygenate well!

O.G. 20.2 F.G. 3.1 A.B.V. 9.5%

This beer was used in both a chicken waterzooi stew and some beer braised meatballs.


On tap no.3 was an English-ish IPA. I used all English hops but I hopped it aggressively enough to give an American "over the top" vibe. This was the second keg to be emptied that night.

Mash: 1.25:1 at 66˚ for 90 min.
10 lbs. Maris-Otter malt
1 lb. Dingemans caravien malt
1/2 lb. Dingemans Biscuit malt
1/2 lb. Breiss 20L crystal malt
Sparge: 5 gal. at 100˚ for 90 min.
Boil: 90 min.
31 AAU's Millenium pellets FWH (First Wort Hop = added to runoff at the start of the sparge)
1 oz. Kent Golding pellets 13 min.
1 oz. Willamette leaf 6 min.
Pitch: White Labs 001 (starter or slurry from previous batch)

O.G. 17.2 F.G. 3.6 A.B.V. 7.5%

This one was used in a beer-cheese ball. Amish Cheddar and Colby with cream cheese, "worst chest hair" sauce, IPA and brown mustard seed pureed in the food processor.

On tap no.4 I had a mistake that I called a "burnt brown ale". The recipe is a variation of my robust porter recipe that didn't ferment down far enough to be a porter but ended up as a nice, if not overly roasty, brown ale.

Mash: 1.25:1 at 68˚ for 90 min.
8 lbs. Maris-Otter malt
1/2 lb. Breiss 90L crystal malt (So you know, my real porter recipe would use Breiss Victory malt in this malts place)
1/2 lb. Dingeman's special B malt
1/2 lb. Chocolate malt
1/2 lb. Black malt
Sparge: 6 gal. at 100˚
Boil: 90 min.
5 ml. Hopshot 60 min.
Pitch: White Labs 005 (I usually use 001 for the porter)

O.G. 15.6 F.G. 5.7! A.B.V. 5.4%

This beer was used in Welsh rarebit. Butter, flour, beer and Cheddar cheese.

Tap no.5 was my Imperial Oatmeal Stout. I make this beer once a year and it's always great. I'm fortunate to still have some left after the party. It's a big rich "meal in a glass" kind of beer so it's hard to drink too much in one sitting.

Mash: 1.1:1 at 66˚ for 90 min.
8 lbs. Otter malt
2 lbs. Quick oats (Quick oats are pre-gelatinized so they'll convert without having to do a separate cereal-mash)
1 lb. 90L crystal malt
1 lb. chocolate malt
1 lb. roasted barley
1/2 lb. 40L crystal malt
1/2 lb. dextrine malt
Sparge: 5 gal. at 100˚ for two hours
Boil: 2 hrs.
7.9 AAU's Cluster pellets 90 min.
Pitch: 005 (slurry from porter)

O.G. 20 F.G. 6 A.B.V. 7.9%

This beer was used in a stout-malt cheesecake fondue dessert type thing. I thought it was great but I think it showcased the beer too much for some people. It would have been too easy to add chocolate and leave the beer as a backround flavor. It was basically 3 cups of heavy cream, 8 oz. cream cheese, 1/2 lb. dry light malt extract and around a cup or so of the stout. I should have added some vanilla. This was served in one of those cheesy (pun intended) fondue fountains that you find at discount stores.


The fountain the morning after. MMMMMMM.

The last beer was a simple pale ale (although it was the third keg to die that night). I served it strait out of the keg since I only have 5 taps on my fridge inside. (I have 3 more outside on the garage but it was too cold to use them). While a good utilitarian ale, it's not interesting enough to worry about posting the recipe. I used it in my first, and very successful, shepherds pie.
I ground lamb and fatty beef (trimmings from the brisket that I used in the carbonade) and cooked it down with minced carrots and onions. I added some beer, "worst chest hair" sauce, salt and pepper and spread it evenly over a full sheet pan. The hard part was spreading a layer of mashed potatoes over the meat but once I succeeded in that it was a great way to heat and serve it.


Before potato spreading.


After spreading.


After being eaten (you'll notice the lack of a proper "done" shot).


And the brewers morning-after treat?

Some of the almost 100 pieces of glassware I got to hand-wash.

I'll be doing a ricotta cheese making experiment tomorrow and I'm overdue on a post about my recent experiences making fresh masa from scratch at home. I appreciate the patience of you who like to read the shit I post. Thanks.

Monday, February 9, 2009

Winter salsa


We're months away from fresh local tomatoes, cilantro and chiles so here's a winter-friendly salsa that still incorporates some fresh local ingredients. O.K., can you really call the tomatillos "fresh" if they were picked almost 4 months ago? I'm going to.

The humble tomatillo is often under appreciated. They are very easy to grow and you only need to plant them once and they will provide volunteer plants every year. They also have the amazing ability to keep for months. This pile is the last two pounds that I picked at the end of October and stored in a bowl on my kitchen counter ever since. Eighty percent of the two pounds was still in great condition. No refrigeration or processing was necessary and I get to enjoy cooking from my garden one more time while I wait for spring.


All you need to make a great tomatillo-chipotle salsa is some garlic (the other local ingredient), chipotle morita chiles, piloncillo sugar and salt.

This is pretty much a typical version of a traditional Mexican salsa with one exception. It's aggressively sweetened with piloncillo sugar. Most recipes I've read use little if any sugar but I love the smoky spicy sweet balance in this version. The other thing that makes this unique for me is that I can actually provide a precise recipe. I used to make this salsa to sell at the market so I took the time to refine the recipe so I could duplicate it every week. Keep in mind the all of the weights are for the ingredients after processing.

1 Lb. roasted tomatillos (husks removed of course). I like to roast them on the grill but in the broiler or in a dry skillet on the stove top is fine. You will loose about 25% of the weight during roasting so buy 35% more so you will have the right amount.

4 1/2 oz. roasted garlic. Roasting in a dry skillet, skin on would be traditional but use whatever method you prefer.

2 1/4 oz. stemmed and seeded chipotle morita chiles soaked in as little hot tap water as you can get away with and still rehydrate them.

3 oz. piloncillo sugar. Brown sugar also works.

1/2 oz. salt

Puree all of the ingredients except the tomatillos until completely smooth and then add the tomatillos pulse them until you get whatever consistency you prefer.

You can, of course, alter the amounts of any of the ingredients to suit your own taste but remember that this is a hot salsa and should be a showcase for the real flavor of the often misrepresented chipotle chile so if you're concerned about the heat, this salsa isn't for you. Mixing it 50/50 with sour cream make a great dip and cuts the heat quite a bit. It also works well as a seasoning paste or use it to braise a pork shoulder. Or just fry up some thick, enchilada-style corn tortillas and eat it as a snack.

Wednesday, December 31, 2008

Deliciousness: The shit I didn't post this year


Popovers are easy. These were served with a simple ramp-butter sauce. Easily one of the top ten best-tasting things I made this year.


Rotisserie duck, a no-brainer, with a couple of oranges, in the cavity, with the spit right through them.


Leftover duck? How about tostadas.


I did a lot of ribs this year. Don't forget to make a bbq sauce with whatever fruit is in season at the time. Tomatoes are great but you can be more creative than that.


Calzone type things. In my opinion they are easier to turn out a great result than pizza and a great use for leftovers. I don't remember what's inside these.


Mmmm, morels. Enough said.


Kung pow octopus.


Once in a while, my friend and fellow Coit Rd. Farmers Market board member, Tony do something we call "meat day". He brings over some huge cut of meat and we spend our Saturday afternoon after market cutting it up and cooking it any way we can think of while drinking excessively. Good quality experimenting time. I think this time we were playing with Thai spices, herbs and stuff.


Fun stuff!


Grilled toms. About to be a great summer sauce.


I love these frozen New Zealand greenshell mussels. They make an easy quick meal topped with whatever you have around. (Top) Grilled with annatto oil and asparagus. (Bottom) from the oven with sesame oil, wasabi and pickled ginger.


Some meatloaf I made at the market. I have no idea what was in this.


Some pasta thing with both a nutmeggy bechamel sauce and a cinnamonny tomato sauce. This thing was delicious.


Fried potato skins stuffed with spaghetti squash that was tossed with red pepper puree and topped with cheese.


Shrimp and andouille sausage meatball gumbo. This was eaten outside with friends while a hurricane (Ike, I think) actually made it's way through Cleveland. Our food blew off our plates and branches fell around us from my 100+ year old maple tree while we ate. This was dangerous but probably the most fun meal of the year.


This pizza may have been the most delicious thing I made this year. It was one of those times when the result was so much better than the sum of the parts. I topped it with stuff I just happened to have around from other cooking experiments, an aji-orange sauce (aji amarillo chiles, cumin seed toasted and freshly ground, granulated garlic, mandarin orange slices in light syrup and heavy cream cooked down and pureed), some pre cooked sweet longaniza sausage and, after it came out of the oven, a cilantro-hazelnut pesto (cilantro, hazelnuts, garlic, locatelli, olive oil and gray salt), which my wife still reminds me "looks like a bird shit on the pizza". The bread machine made a great dough and the pizza stone was screamin' hot. I haven't even tried to duplicate this one, I don't want to be disappointed.


Thanks to all of those who took the time to read this crap this year. I'll try to be better at responding to peoples comments and while I'm at it, I'll try to take better pictures and learn how to use the blog well enough to add the blogs I follow and all of that other stuff the rest of you have already figured out. Peace.

Thursday, December 4, 2008

The pit revisited: lamb

For our second pit-roasting experiment, we decided to do a lamb for Thanksgiving. Since local lambs were not available this time of year we headed to the restaurant store to pick up a 25 lb. frozen Australian lamb.


We seasoned it by inserting dozens of whole cloves of garlic into slots we cut all over the animal. We intended to stuff the cavity with lots of fresh rosemary but the store was out of it. Instead, we decided to make a rosemary infused olive oil. I took a cup and a half of olive oil and slowly heated it and an ounce of dried rosemary to about 200 degrees and let it rest for a few hours and strained it. Using a brine pump, we injected the oil into all of the thickest parts of the animal.


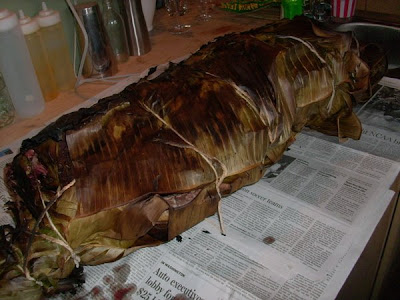
We rubbed the whole thing down with salt and pepper and tucked the hind legs up into the body before wrapping it in a single layer of banana leaves. Following my own suggestion from our first pit-roasting experience, we also started with much more coals and burned the pit for three full hours to preheat it.


As you can see, we had 16" or more of coals. We mounded them up on both sides to make room for the lamb. We could smell the banana leave smoking a soon as we placed it in the pit so we quickly covered it with the steel lid and plenty of dirt. It spent a whole 17 hours underground before we unearthed it.


The lamb was cooked beautifully, the garlic and rosemary oil perfumed the lamb nicely and we were happy with the touch of smoke that the burning banana leaves gave the lamb. But it was clear that the pit had dropped below cooking temperature hours earlier. The meat was barely warm when we unwrapped it. We thought that by starting with an animal half the size, with no skin, using less banana leaves and using more coals for a longer time might even result in over-done meat. We now know for sure that it is nearly impossible to over-cook anything using this method. When we build the final version of the pit, we will use much more brick (for more thermal mass) and add a adjustable vent to allow a small amount of air to the bottom of the pit so the coals can be fed and allowed to smolder longer.

We will need a few more experiments and learn a little more about temperature control before we will be ready to cook a 100+ pound hog in the ground but we we do have a much better idea of what the design of the final version of the pit should be.

Thursday, November 20, 2008

Turkey mole


Since turkey day is upon us, I thought this would be a good time to consider preparing it similar to the way that people were likely preparing it on this continent long before any Europeans even new this bird existed. Unfortunately, mole is another one of those recipes that people tend to shy away from doing at home. It's not nearly as hard to prepare as most recipes make it sound. Moles often have twenty or more ingredients and each ingredient has to be roasted, toasted, fried, charred (sometimes burnt), ground, re hydrated or any combination of these things. Still, as long as you have some dried chiles around, most people have a well enough stocked pantry to make a good version, from scratch, all their own.

It helps to break down the sauce into groups of ingredients and pick one or more ingredients from each group.

The chiles.

Clockwise- ancho, mulato, pasilla, pulla and guajillo.

Dried chiles make up the bulk of a good mole even though they aren't usually very spicy. You can make a good sauce with just one type of chile but using several will give you a more complex end result. I almost always use guajillo and/or ancho as the primary chiles. Mulato and/or pasilla, with their extra deep flavors, add a nice second dimension and I used some pullas, guajillos slightly hotter cousin. There is no reason to follow these guidelines. If all you have is a pile of cascabels, then use those. Once the chiles are stemmed and seeded they should be either fried in oil or toasted. This time I toasted them.

Once they are all toasted, re hydrate them in a bowl of hot tap water. After 15 minutes, throw them in your blender and puree.

Dried fruits, seeds and nuts.


If all you have are roasted peanuts and raisins (most people do) you will be fine. I love sesame seeds (and I have pounds of them) so I always use some of those. They also make a nice garnish for serving. This time I also used cashews and some dried cherries from Michigan which added a nice fruity note. Pumpkin seeds are a very common addition. If the nuts and seeds aren't already roasted, toast or fry them. Add the seeds and fruits to your blender and puree them. I always add the nuts last. My Vita-Mix is a motherfucker of a machine but once the fats from the nuts begin to emulsify with the water, even it gets a little pissed at me.

Spices.


Cumin and coriander are always a good idea as are black peppercorns. I consider a stick of Ceylon cinnamon crucial but that's just me. Other sweet spices add a nice touch so I use a little clove and allspice. On the herbal side I used bay leaves, Mexican oregano, savory (thyme would be more common) and an avocado leaf. Avocado leaves have a slightly anise-like flavor so if you don't have them, you may want to add some fennel seeds, anise seeds, a star anise or none of the above. Since I dry toasted the chiles and other ingredients, I decided to fry the spices in a little oil. If you have a good blender, you should be able to add them directly to the puree. If your not sure they will blend well enough, dry toast them and grind them separately first.

Aromatics and veggies.


Onions and garlic are a given. You can roast the garlic (individual cloves, still in their paper, heated in a dry skillet) or not. The onion can be added raw or cooked. Sometimes the onion will be cooked, cut side down, in a pan until it burns. Tomatoes and/or tomatillos are often used and you may want to try a banana or plantain (fried would be nice) or mango or pineapple. be creative. I cooked the garlic and onion along with the last couple of pathetic tomatoes and tomatillos from my garden in a little oil until everything started to burn a little.

Add the veggies to your puree.

Most recipes will use some stale tortillas or bread to thicken and bind the puree. You may or may not choose to toast or fry them first. I added a couple of leftover tostada shells. Now you want to add the nuts and get the puree as fine as you can. You will need to decide if you want to strain it or not. I prefer to strain it (through a chinois) in order to get a silky smooth result but if you have a really good blender and want to save some time you can skip this step.


The strained sauce.

Now it's time to fry the sauce. Many people have never used this technique that is common for dried chile sauces in Mexico. Frying the sauce takes away the brassy-bitter edge and makes it sweeter while adding to the overall depth of flavor. Heat a cast iron kettle until it is screaming hot. Add a little lard or oil and immediately add all of the puree at once.


This can be messy but it's important. You want to keep stirring and reducing it until it's several shades darker. Then add some water or stock, lower the flame and simmer with the lid cracked so it can reduce further.

Chocolate is easily the most famous ingredient in moles. It is what make them sound so exotic (You will often see recipes titled "chicken in chocolate-chili sauce"). It is important but more of a secondary flavor or seasoning. Mexican chocolate is the right thing for the job but chocolate in other forms will also work. In this case I used an extremely dark baking chocolate mainly because I forgot to check and see if I had any Mexican chocolate in the house. Now is the time to melt it into the sauce.

All that is left is to season it with salt and sugar. Salting to taste is easy but don't over sweeten it. Most commercial moles are over sweetened to cater to those who aren't used to the extremely complex bitter notes in a good mole. I use Mexican piloncillo sugar which is just unrefined dehydrated cane juice. Jaggary is also a nice idea as is any raw sugar but if you don't have any of those, brown sugar or regular white sugar will work.

The turkey is simply braised in the sauce. I was making a ton so I could share it at my civic club meeting and at the market the next day. I split two 13 lb. turkeys and browned them in two cast iron skillets. When browned well, I turned them over and covered them with a generous amount of the sauce.


Cover and cook in a slow oven (325˚or lower if you have more time) until it pulls from the bone easily. For serving to a crowd, I separated all of the meat (and skin) from the bones and served it over rice and on corn tortillas.

When you think your sick of eating leftover turkey, heat some up in your homemade Mole. It will be transformed into something completely different.

Thursday, November 13, 2008

Puerco pibil

I finally got around to digging a pit so I could do a real "Yucatan style" pit-roasted pig.


I dug a hole 3'x 4'x 2 1/2' which I lined with brick that was salvaged from a recently demolished school. The size of my pit was determined by the size of the steel cover that my friend scrounged up from his shop. Although the finished with of 30" is good, I intend to lengthen it to 5-6 ft from the 42" that it is now. The 50 lb. pig that I got had to be beheaded in order to fit in the pit.


The pit happily burning away.


The almost complete lack of good descriptions for this style of pit-roasting is sad. I was able to find some good info on how to do it "luau style". Most recipes will give a short explanation of how it used to be cooked it in a pit, but go on to describe making it in an oven or crock pot. Pit roasting is a smoke steaming process and without the smoke from burning banana leaves it will not be the same. Sure, pork slow cooked in an achiote marinade will be tasty but it wont be puerco pibil.

The marinade

8 oz. annatto seed
1.75 oz. black peppercorns
1 oz cumin seed
1/2 oz whole allspice
1 3" stick Ceylon cinnamon
1 1/2 lbs. peeled garlic
2 whole habanero chiles (from my garden)
4 cups of orange juice
1 cup of lime juice
1 healthy fistful of kosher salt
Grind the spices and puree with the balance of the ingredients.

Many sources (even Wikipedia) suggest that annatto is primarily used for color. One person even suggested substituting paprika. Annatto is one of the main flavors in the dish, paprika isn't at all appropriate. You wont have any trouble grinding the other spices but annatto seed is hard to grind to a fine powder. Grind it the best you can. The marinade will have a gritty texture but after the long cooking, the little bits will soften up and you shouldn't notice them.
I used lots of garlic, more than any recipe I read would suggest. Use your best judgment.
Traditionally, sour oranges would be the citrus of choice. Some day I will track some down and try them but I chose to use regular orange juice with some lime juice. Acidity is important and most recipes will suggest much more lime (or lemon which is similar in acidity to seville oranges) or even vinegar than I used here. I err on the less acidic side for things that are going to marinade for a long time. Years ago I made a pork shoulder in achiote that was made with vinegar and after a 24 hour rest, the vinegar had "cooked" the meat and I was unable to get an appealing texture after it was actually cooked. Be cautious with lime juice or vinegar but you could probably get away with more than I used.
The other crucial "ingredient" is banana leaf. You will be wrapping the pig completely in the leaves which will trap steam and add an important herbal flavor that is key to a proper end result. They should also be allowed to burn a little in order to get some smoke flavor. Don't use too many layers or the smoke wont penetrate.


The pig.


I bought a 50 lb. pig at the local butcher shop. As I mentioned before, even a very small pig like that was too long for my pit so we removed the head. We also removed the hocks so it would be easier to wrap in the banana leaves. From the inside, we cut some big slots into the thickest part of the rear legs and the shoulder so we could get some marinade in there and so it would cook more evenly.


Sucks to be delicious


Lay down multiple pieces of butcher twine and lay a couple of layers of banana leaves across them. Set the thoroughly rubbed down pig on top, cover completely with more leaves and tie it up.


We made a cradle out of some concrete reenforcement wire although any plain steel fencing or chicken wire would work well.

The fire.


My friend came over at 5 am Sunday morning to get the fire going. Standing around a huge fire, on a crisp fall morning, drinking a beer and watching the sun come up was extremely pleasant. It has been quite a while since I've had beer for breakfast and I forgot just how fun it is.

You will need a shit-load of fire wood to get enough hot coals to cook this thing for the nine or more hours it will spend in the ground. Most references suggest two to three times the volume of the pit and that is about right. We used a variety of scrap hardwoods from my friends shop that burned down to a nice 10" deep bed of coals in about two hours. If you are using logs, you may want to give yourself three to four hour to get it burned down enough. Shoot for a full 12" of coals. Put the pig, back down directly on the coals.


Place the cover over the pit and seal completely with damp dirt. If you see any places where steam or smoke are escaping cover with more dirt and pack it down. Now it's just a waiting game. We left ours for 10 hours and while it was done, It could have cooked a little longer. You are far more likely to under cook it than over cook it. My guess is that it would have been even better if we had left it until the next day. Once the pit is sealed the only thing cooking the meat is the residual heat stored in the brick. By a strange coincidence, my friend ran into a guy from Georgia at a bar in Pittsburgh the night before we did this. Having done many pig roasts, he gave him many pointers on how to go about it. He was correct for the most part but he did suggest that we add a bag of hardwood charcoal just before sealing the pit. This doesn't work. The coals will die down once they are deprived of oxygen and the charcoal never even lit. In fact, when we opened the pit it looked the same as when we closed it.


MMMMMMM!

We ate it as tacos on home made tortillas (gotta do something with all that time while the thing roasts), shredded romaine, Pickled onions (onions, lime juice, orange juice, annatto oil and salt) and a tomatillo-panca chile salsa (roasted tomatillos, roasted garlic, aji panca, dry malt extract and salt).


That's probably how it actually looked to my Doppelbock compromised brain

The things that I need to keep in mind for my next time:

More entry points (cut more slots) for marinade and a longer marinading time- The flavor wasn't as strong as I would have liked.

Less banana leaves- They need a chance to char through in order to get some smoke flavor.

More coals- The pit didn't sustain enough heat to cook it as well as I had hoped. It fell just short actually "falling apart" tender. (We did build a fire on top of the lid toward the end to add more heat.)

If you've got some room in your yard, I suggest building your own pit. I expect to do a lamb next and maybe a goat after that. Or maybe a couple of banana leaf wrapped, mole' rubbed turkeys for thanksgiving.